Link Aggregation
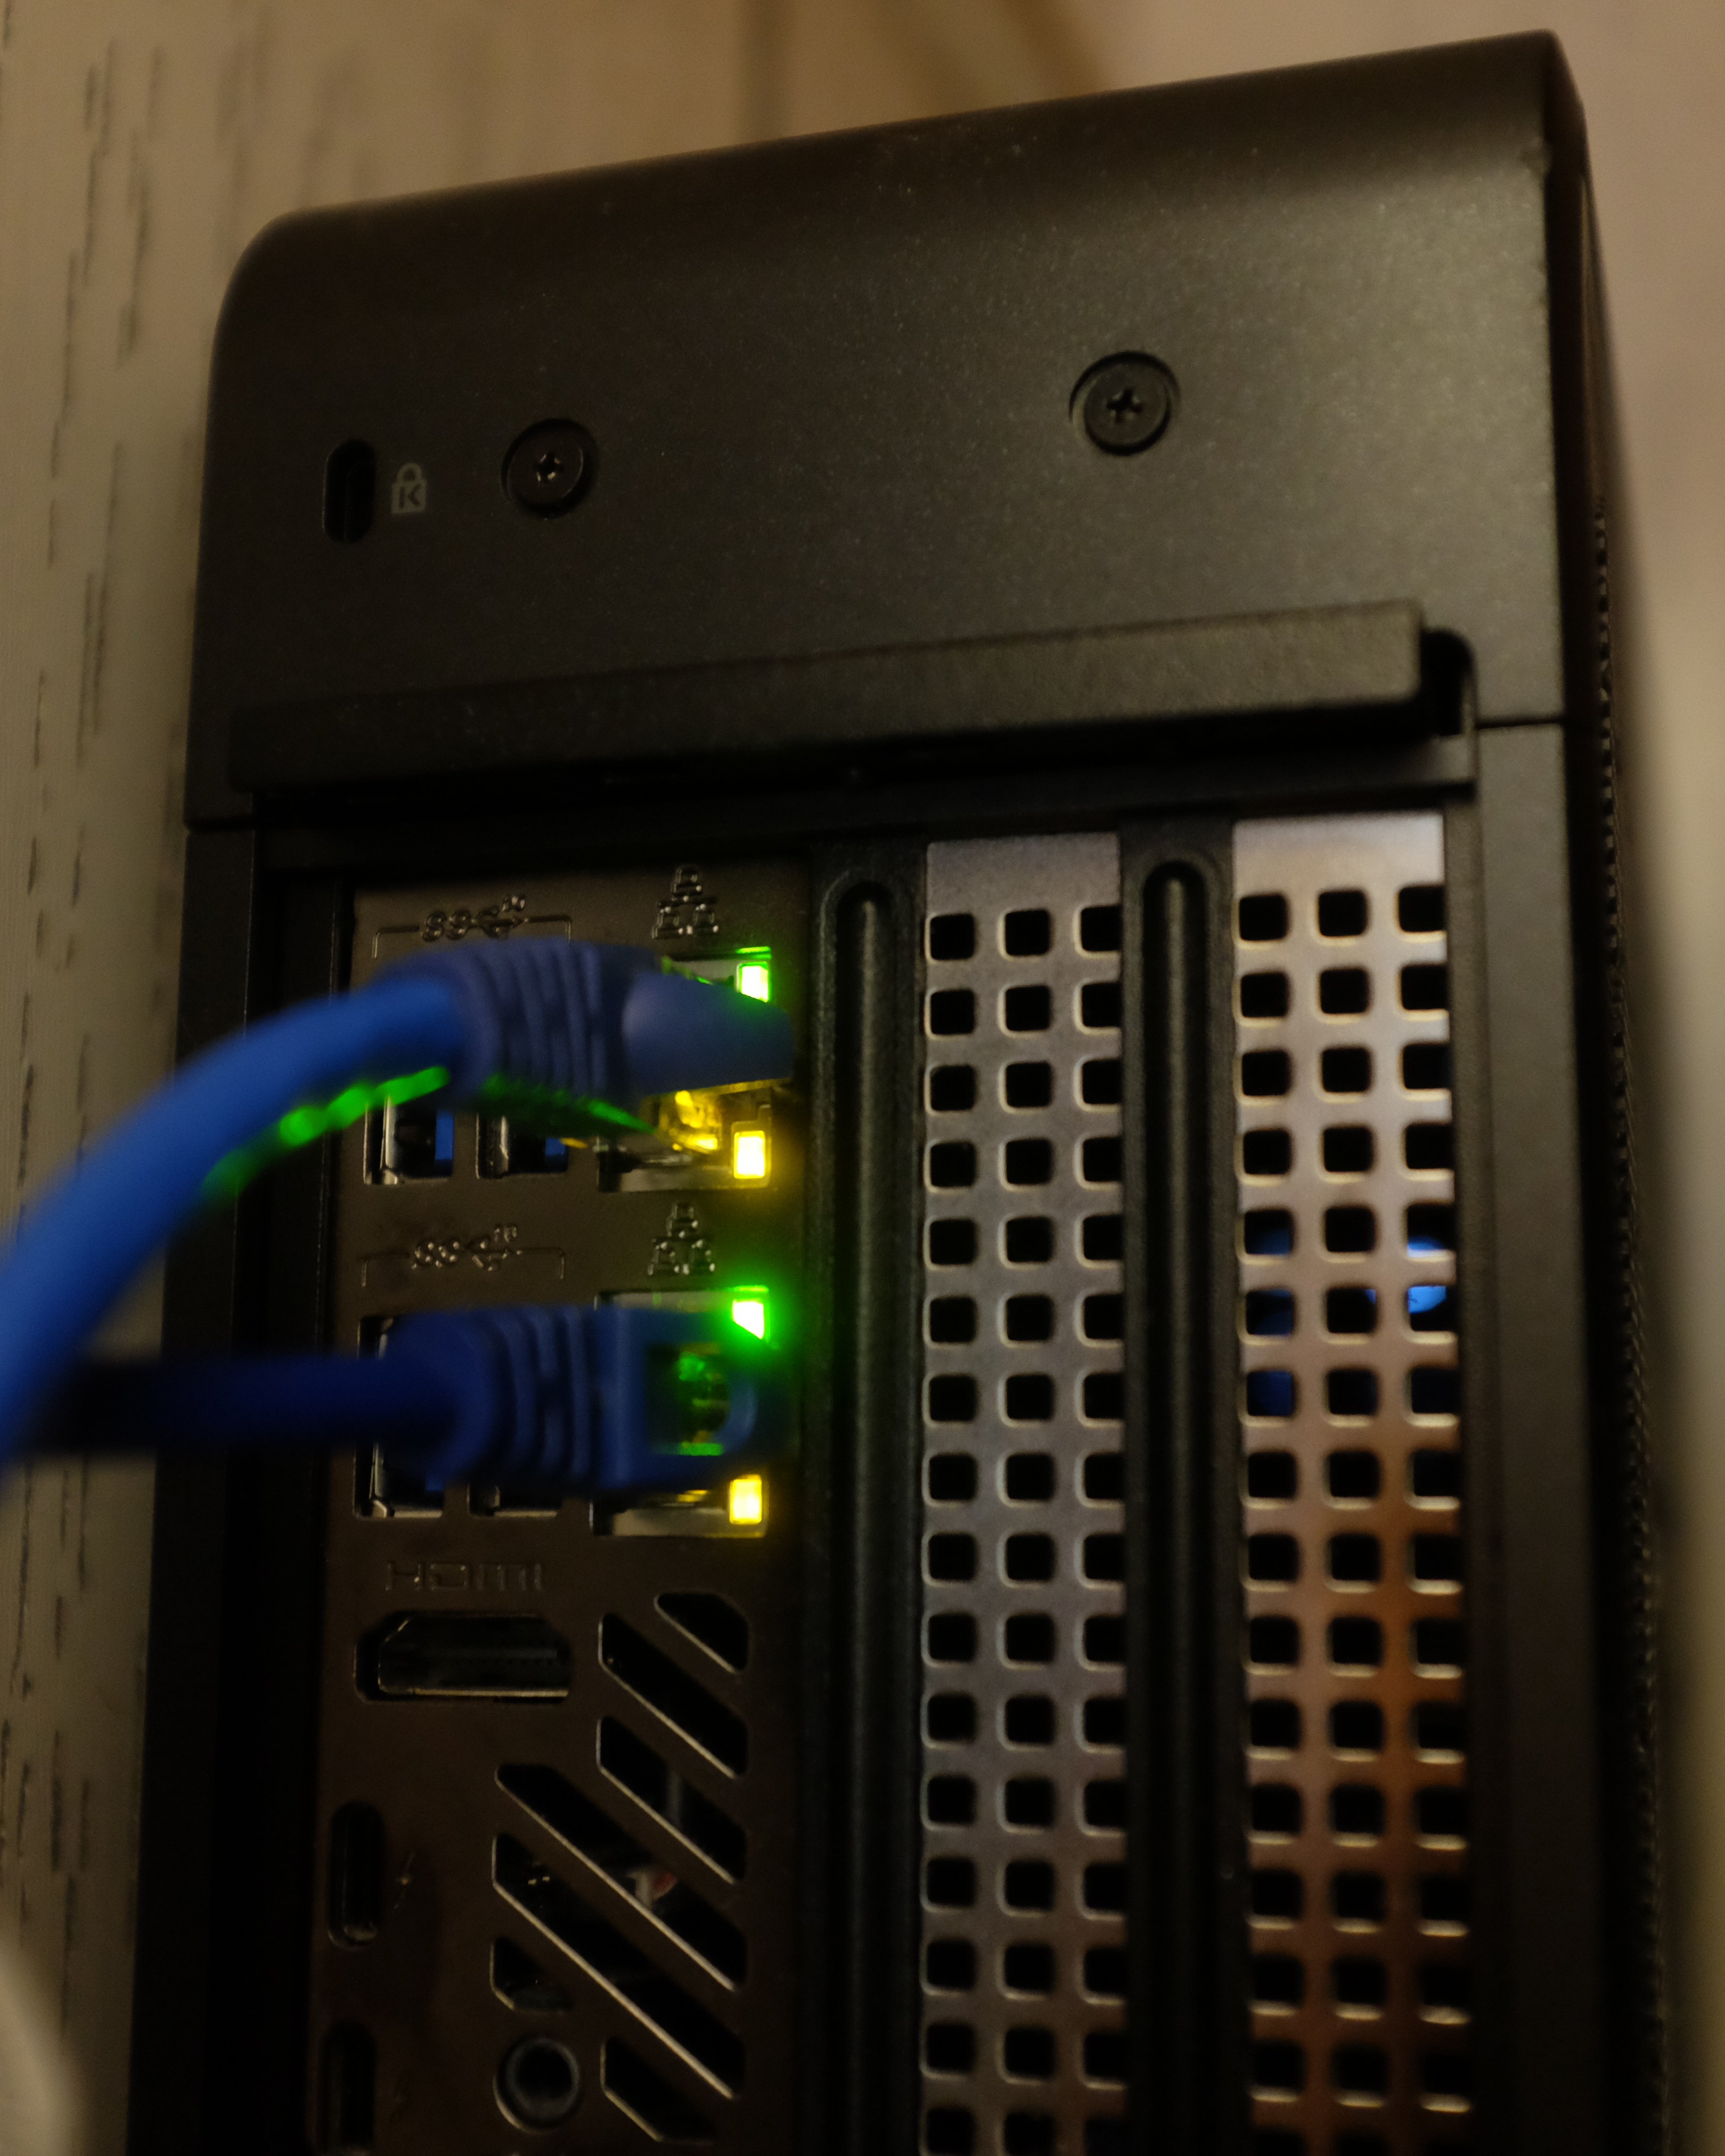
So after moving our server to the linen closet I realized it had a second NIC in back, which of course meant I had to use it. Now that I have control over the network infrastructure, I can set up link aggregation.
Link aggregation allows you to bundle multiple physical connections between two devices into a single one. On Cisco IOS, you create a numbered port channel, and configure the physical interfaces to use the corresponding channel group, also specifying the mode. This process has always been annoying to me because instead of explicitly declaring the protocol – either Link Aggregation Control Protocol (LACP) or Port Aggregation Protocol (PAgP) – you imply it with the mode.
LACP’s modes are active and passive while PAgP’s include a few more but you’ll usually use auto or desirable. The only reason I can think of for these interchangeable and sometimes misleading keywords is for cert test purposes.
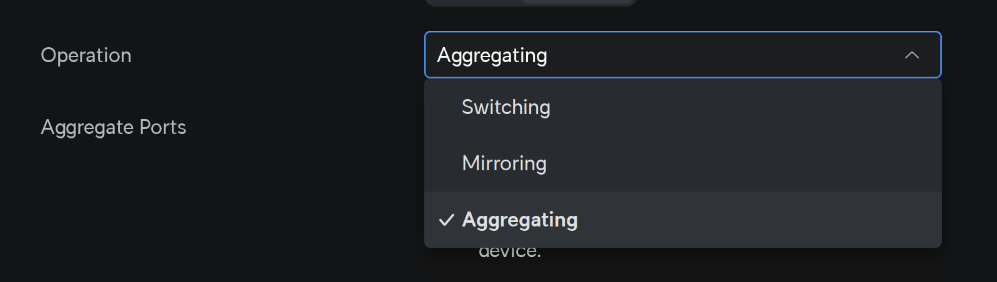
Fortunately, in Ubiquiti you click into this dropdown, which activates LACP (PAgP is Cisco proprietary).
Between network devices it’s pretty easy and you just configure both sides equally, but on the server side I finally had to reckon with one of my big blind spots – Linux networking. The configuration is scattered across a number of commands and files in such a way that I don’t even really know how to write about them. But I guess I’ll try.
For many years, ifconfig was the go-to command to do things like set ip addresses and turn interfaces on and off (not to be confused with the ipconfig command in Windows. But you would have to set your default gateway with the route add command. Now those are deprecated and the best practice these days is to use ip addr and ip route. This makes googling answers a bit difficult because a good number of writeups are still using ifconfig.
And then for DNS you need to configure dns by editing /etc/resolv.conf.
By default there’s the networking service that handles this all to a certain extent, but then you can also install NetworkManager that runs alongside networking so you can use the nmcli command to configure it.
There’s even more and I’m not even going to get into wireless, but nmcli did most of the heavy lifting here. I was going by this guide from Red Hat. Here, I think “bond” is the term for port channel or etherchannel or whatever you want to call it (I’m sure there are some very important distinctions depending on how pedantic you want to get about it).
nmcli conn add type bond ifname po1
The above makes a logical port arbitrarily named po1 (this is just what it would have been called on a Cisco device). Then you need to add your physical interfaces to it:
nmcli conn add type ethernet eno1 master po1
nmcli conn add type ethernet enp110s0 master po1
The two interfaces on the server are named, inexplicably, eno1 and enp110s0. At this point I lost connectivity to the server and had to set up the world’s most annoying crash cart (more on this in a later post).
The two NICs had link lights flashing, but I couldn’t get any layer 3 traffic through. It turned out I needed to enable LACP on the interfaces with:
nmcli conn modify po1 bond.options "mode=802.3ad,lacp_rate=slow"
And now we have a 2 gigabyte uplink for this server. I have no idea what the point of this all was. Also it broke VMWare for a minute because I needed to specify the new interface for it to use.
Bird is not ready.
WHAT THE HELL IS BIRD.
Readiness probe failed: calico/node is not ready: BIRD is not ready:
Error querying BIRD: unable to connect to BIRDv4 socket:
dial unix /var/run/calico/bird.ctl: connect: connection refused
Followup: I did a bunch of network futzing on the node, and broke pretty much everything, and after I got it up again, Calico stayed broken with this error message. A reboot cleared it up and I never figured out what BIRD was, but I kind of want to remain ignorant of this one thing because it makes error querying bird/bird is not ready way funnier.
It was DNS
❯ nslookup minecraft-0.minecraft.tristan
Server:		192.168.1.1
Address:	192.168.1.1#53

Name:	minecraft-0.minecraft.tristan
Address: 10.100.0.1
Had a fun breakthrough this morning on the cluster. I had been trying for a while to expose the CoreDNS to the home network. Like anything DNS, there were a number of hurdles to clear along the way.
Until now I had been adding static domain entries at the gateway, which works fine but just feels like too much of an easy way out. Also, having to ask for a new entry every time you pop open a new service is a bit of a pain, especially when you’re just messing around and have no idea which ones you’re even going to keep in the end.
So, the first order of business is CoreDNS. It’s already dynamically providing DNS inside the cluster. It’s exposed as a ClusterIP service:
❯ kubectl -n kube-system get svc
NAME           TYPE           CLUSTER-IP       EXTERNAL-IP
kube-dns       ClusterIP      172.17.0.10      <none>
You can query it from your node, and it’ll give you a response. If you have a service exposed, you should be able to find a record for service_name.namespace.svc.cluster.local.
❯ nslookup minecraft-0.minecraft.svc.cluster.local 172.17.0.10
Server:		172.17.0.10
Address:	172.17.0.10#53

Name:	minecraft-0.minecraft.svc.cluster.local
Address: 172.17.236.254
Now we have a few problems. First, CoreDNS is exposed via a ClusterIP (here, 172.17.0.10), which is only accessible from inside the cluster. Second, if you query it, it will give you another 172 address, which again is no good from outside the cluster! Also, the .svc.cluster.local domain is kinda clunky.
I came across this Reddit post, which also covers MetalLB, but I just picked out what I needed for CoreDNS, namely setting up the k8s_external plugin, which is a matter of editing its configmap with kubectl -n kube-system edit cm coredns and adding:
k8s_external tristan {
   headless
}
I added the headless keyword because we have a number of StatefulSets and those are headless. The above entry adds the tristan domain to CoreDNS, and when it is queried for service_name.namespace.tristan, it will give the external IP addresses:
❯ nslookup minecraft-0.minecraft.tristan 172.17.0.10
Server:		172.17.0.10
Address:	172.17.0.10#53

Name:	minecraft-0.minecraft.tristan
Address: 10.100.0.1
Progress! However we still have that 172 address for CoreDNS, so we’ll need to expose that through MetalLB:
apiVersion: v1
kind: Service
metadata:
  name: kube-dns-ext
  namespace: kube-system
  annotations:
    metallb.universe.tf/allow-shared-ip: "DNS"
spec:
  type: LoadBalancer
  ports:
  - port: 53
    name: "udp"
    targetPort: 53
    protocol: UDP
  - port: 53
    name: "tcp"
    targetPort: 53
    protocol: TCP
  selector:
    k8s-app: kube-dns
❯ kubectl get svc
NAME           TYPE           CLUSTER-IP       EXTERNAL-IP
kube-dns       ClusterIP      172.17.0.10      <none>
kube-dns-ext   LoadBalancer   172.17.233.207   10.100.0.5
So, now we can query a useful ip (here, 10.100.0.5) and get useful responses!
❯ nslookup minecraft-0.minecraft.tristan 10.100.0.5
Server:		10.100.0.5
Address:	10.100.0.5#53

Name:	minecraft-0.minecraft.tristan
Address: 10.100.0.1
There was more work to do at this point though, because I needed to set up the home gateway to forward queries for the tristan domain to CoreDNS. Coincidentally, Ubiquiti just added that functionality in their latest update:

So now we don’t even need to specify CoreDNS and can just send queries to our gateway:
❯ nslookup minecraft-0.minecraft.tristan
Server:		192.168.1.1
Address:	192.168.1.1#53

Name:	minecraft-0.minecraft.tristan
Address: 10.100.0.1
Virtual Realty
I have a confession: I skipped pretty much all of hardware virtualization and dove straight into containerization and orchestration. I had been doing just fine till now. My ENCOR Lab Manual arrived.
I had purchased a license to Cisco Modeling Labs during Black Friday and hadn’t really used it till now. You’ve got a few options – namely bare-metal or VM. I do have a few viable machines for bare metal installation, but that would have been too easy, right?
VMware Workstation was easy enough to get running on Nunu, our shared family server. I did run into a day’s worth of issues becuase I was trying to get it working through SSH X11 tunneling. The CML image wanted some swap space, which, unfortunately, is disabled on Nunu for the sake of Kubernetes. The alternative was to enable reserved memory from the host, which required root permissions.
This was where I ran into the “never run a GUI as root” issue because VMWare Workstation has a graphical console. I still don’t get what was going on but I think because I was SSH’ed in, pkexec was losing the DISPLAY variable. Eventually I installed TigerVNC on Nunu and my laptop and VNCed in as myself, which let me run it with the right privileges.

CML is now working properly and I finally get to do something with it. Things like these are why I try to keep as close as possible to CLI and text-based work. Whenever there’s an environment to build out and work in, I always find myself fighting with the environment instead of working with it.
Anyway, time to stop whining and get to work. I’ve got these in my .zshrc to bring it up and down:
alias cml-start='ssh nunu vmrun -T player start /home/jay/vmware/cml2_p_2.8.0-6_amd64-32/cml2_p_2.8.0-6_amd64-32.vmx nogui'
alias cml-stop='ssh nunu vmrun -T player stop /home/jay/vmware/cml2_p_2.8.0-6_amd64-32/cml2_p_2.8.0-6_amd64-32.vmx nogui'
telemetry
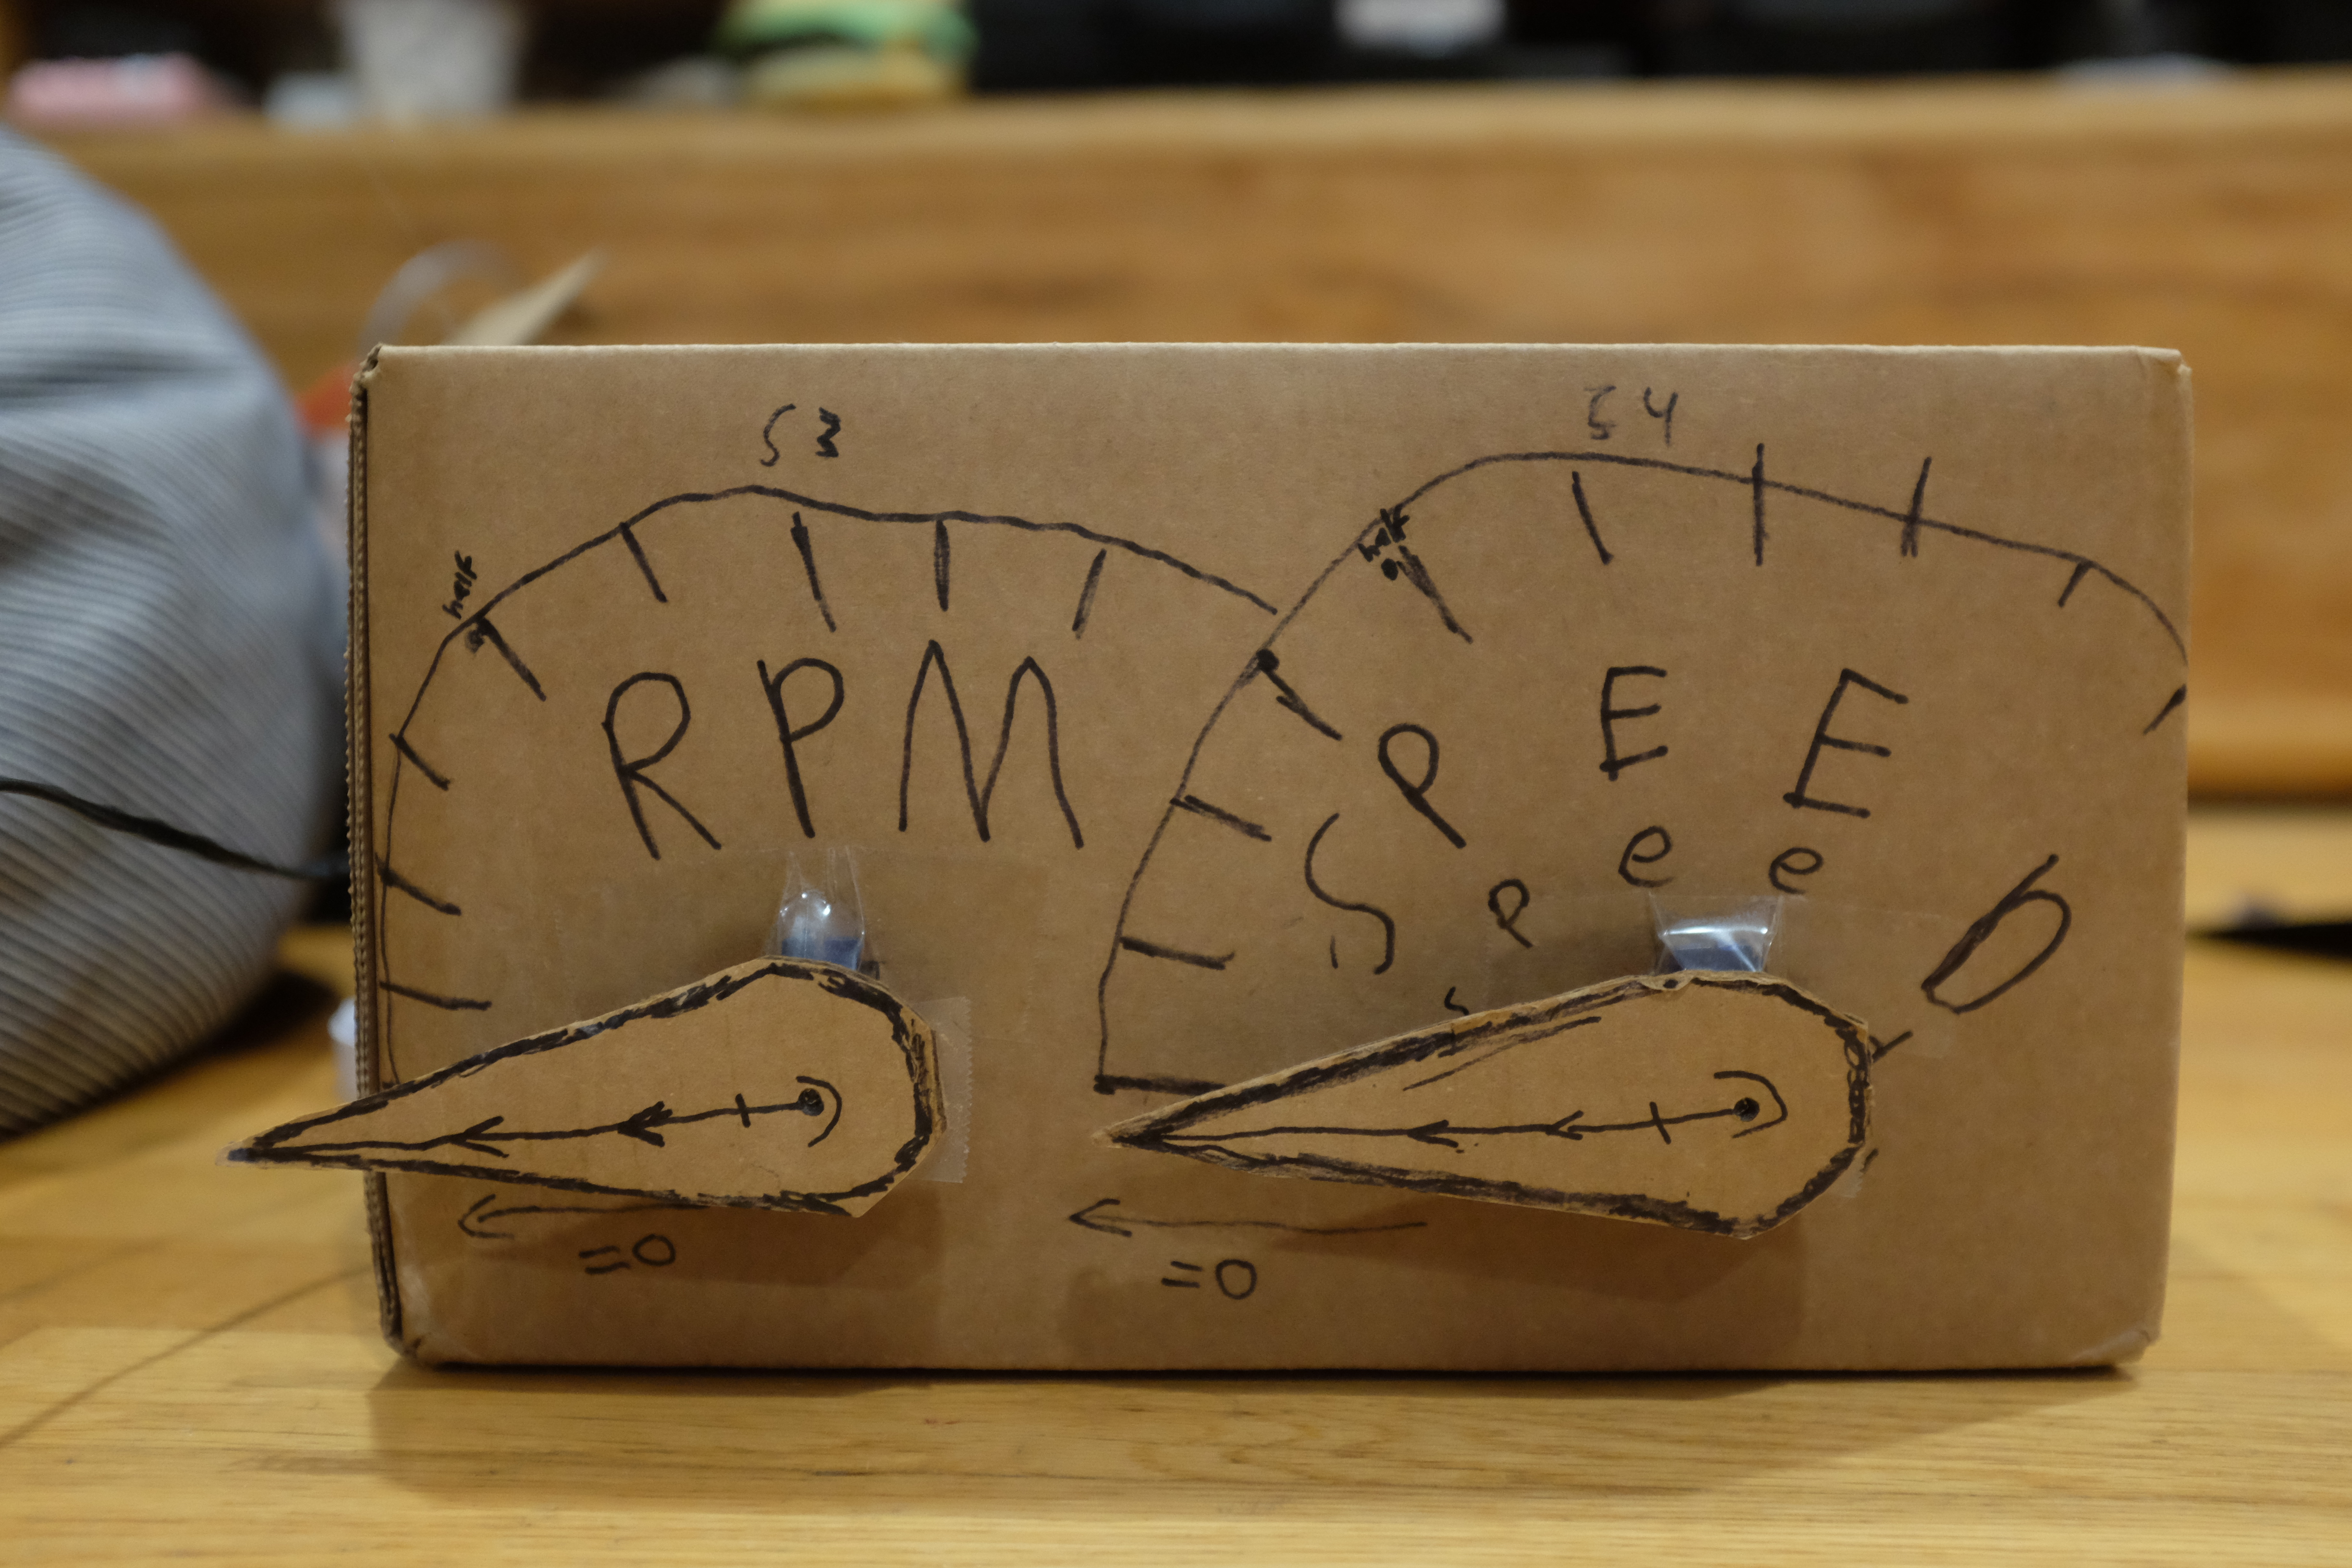
One of several undocumented achievements this year, and probably my proudest, was this speed/tach for EA’s F1 2024. I managed to pull in the whole family to make this happen, with some amazing contributions from each member.
Work had sent me to Cisco Live in June, where there was a pretty sizable McLaren F1 presence since Cisco are one of their major sponsors. Zak Brown and Oscar Piastri were there for one of the major keynotes.
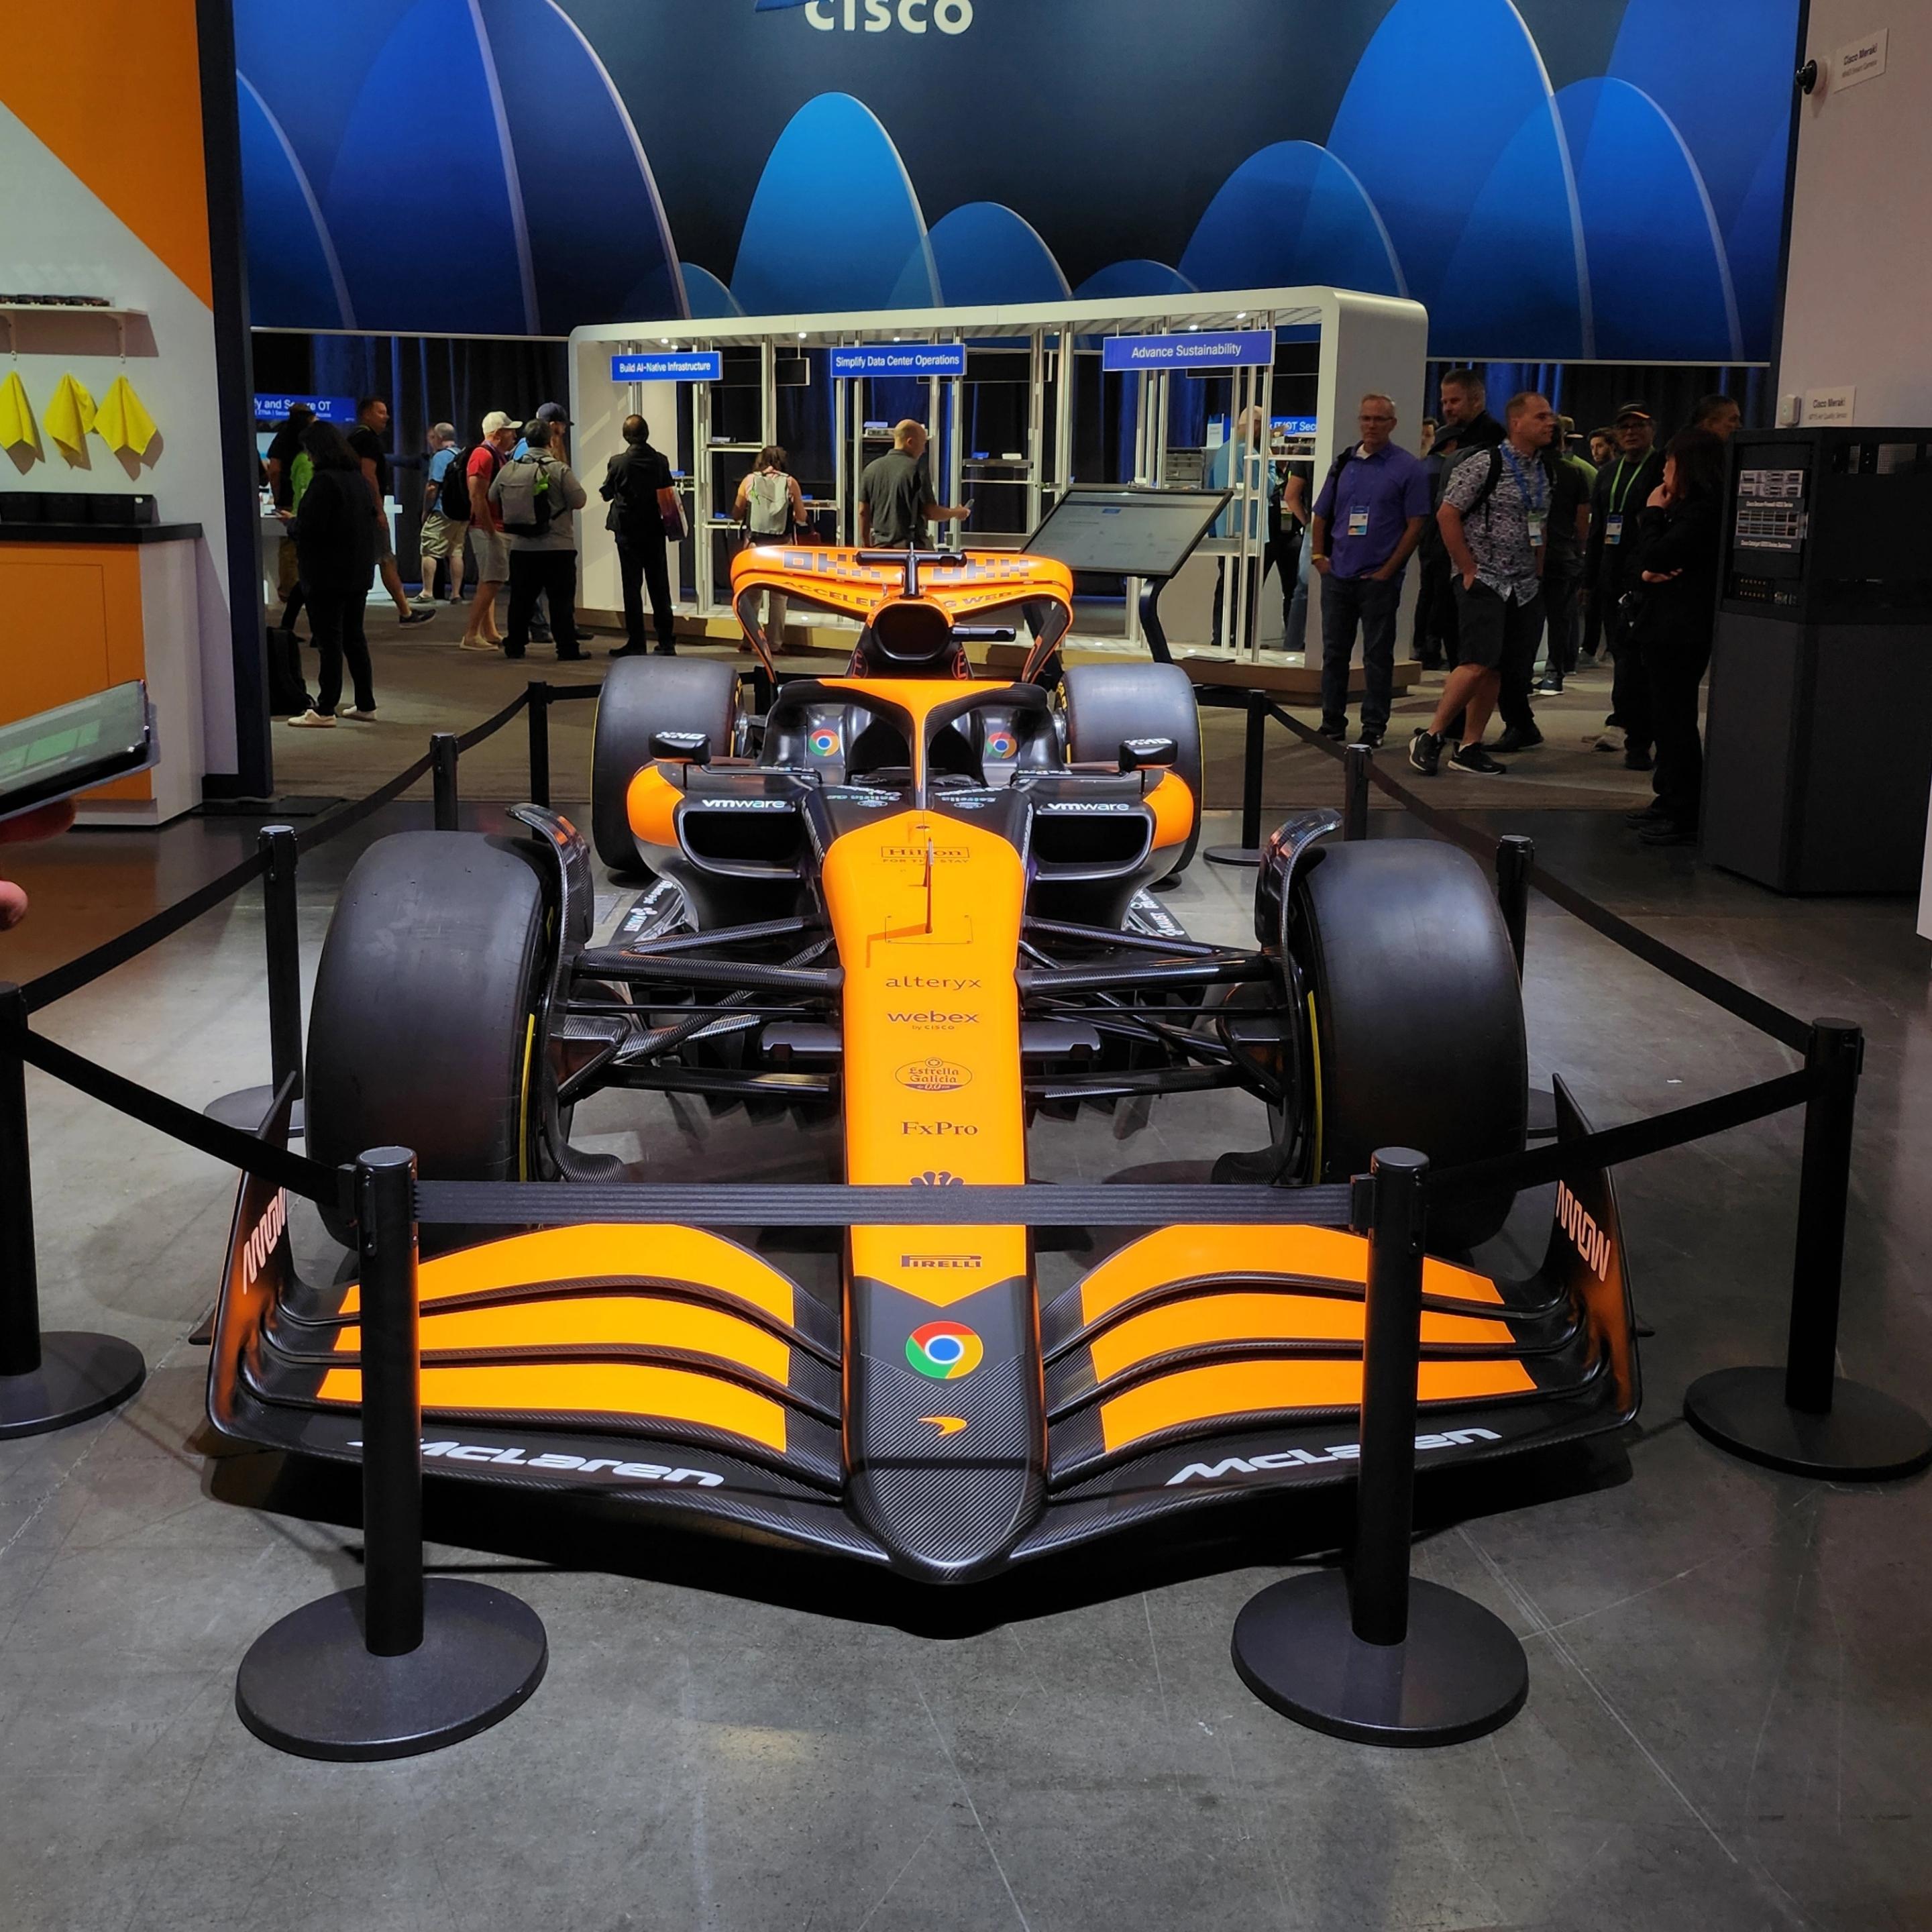
Anyway, there was a Splunk demo booth at the show floor with some racing simulators set up. I tried my hand and managed to get second place at the time (not that huge of an achievement since it was pretty early in the day. I checked back in a few hours later and the best time was several seconds faster than the one I had posted). On the sides of the booth, Splunk was demoing a plugin that tracked telemetry data streaming out from the game. It saw everything from tire temperatures to steering and throttle/braking inputs, but for the purposes of Cisco Live, it had a simple map of the Montreal track with a heatmap of speeds that players were traveling at.
The main takeaway from this was, there was some manner of data being streamed out from the game. Some further research brought me to a forum post where there was a pretty formal looking pdf file detailing the spec.
Apparently, when set to do so, the game puts out a stream of UDP packets to a port and destination of your choosing. The payload of each packet is a bunch of unstructured binary information to pick apart. This was where I enlisted my wife, who deals with data streams in her day job. I showed her the doc from EA, and she knew exactly what to do with it. At this point it was only a passing “Hey wouldn’t it be neat” sort of thing but a few hours later she came back and told me she had written a preliminary parser for the telemetry stream, and from there it was up to me to figure out what to do with that data.
I had to tweak the code a bit because I really just wanted to focus on the speed and tachometer metrics (you really get everything out of this stream, including car pitch/roll, track temperature, individual tire temperatures, etc.), but my contribution to this all was on the network side. The only way to test the code was to capture a live stream, and the only way to have a live stream was to be (ostensibly) playing the game. For the first few iterations I would have to play the game while my wife watched the printlines to the console, but I realized I could simulate this with a packet capture.
Wireshark has a replay feature where you can give it a recording of packets and it will send those back out on the network at your request. This is where things like replay attacks happen. Anyway, I recorded the UDP stream of myself driving around Suzuka, and had Wireshark replay that over multicast on the network. From there, whoever was interested could listen in and test their parser.
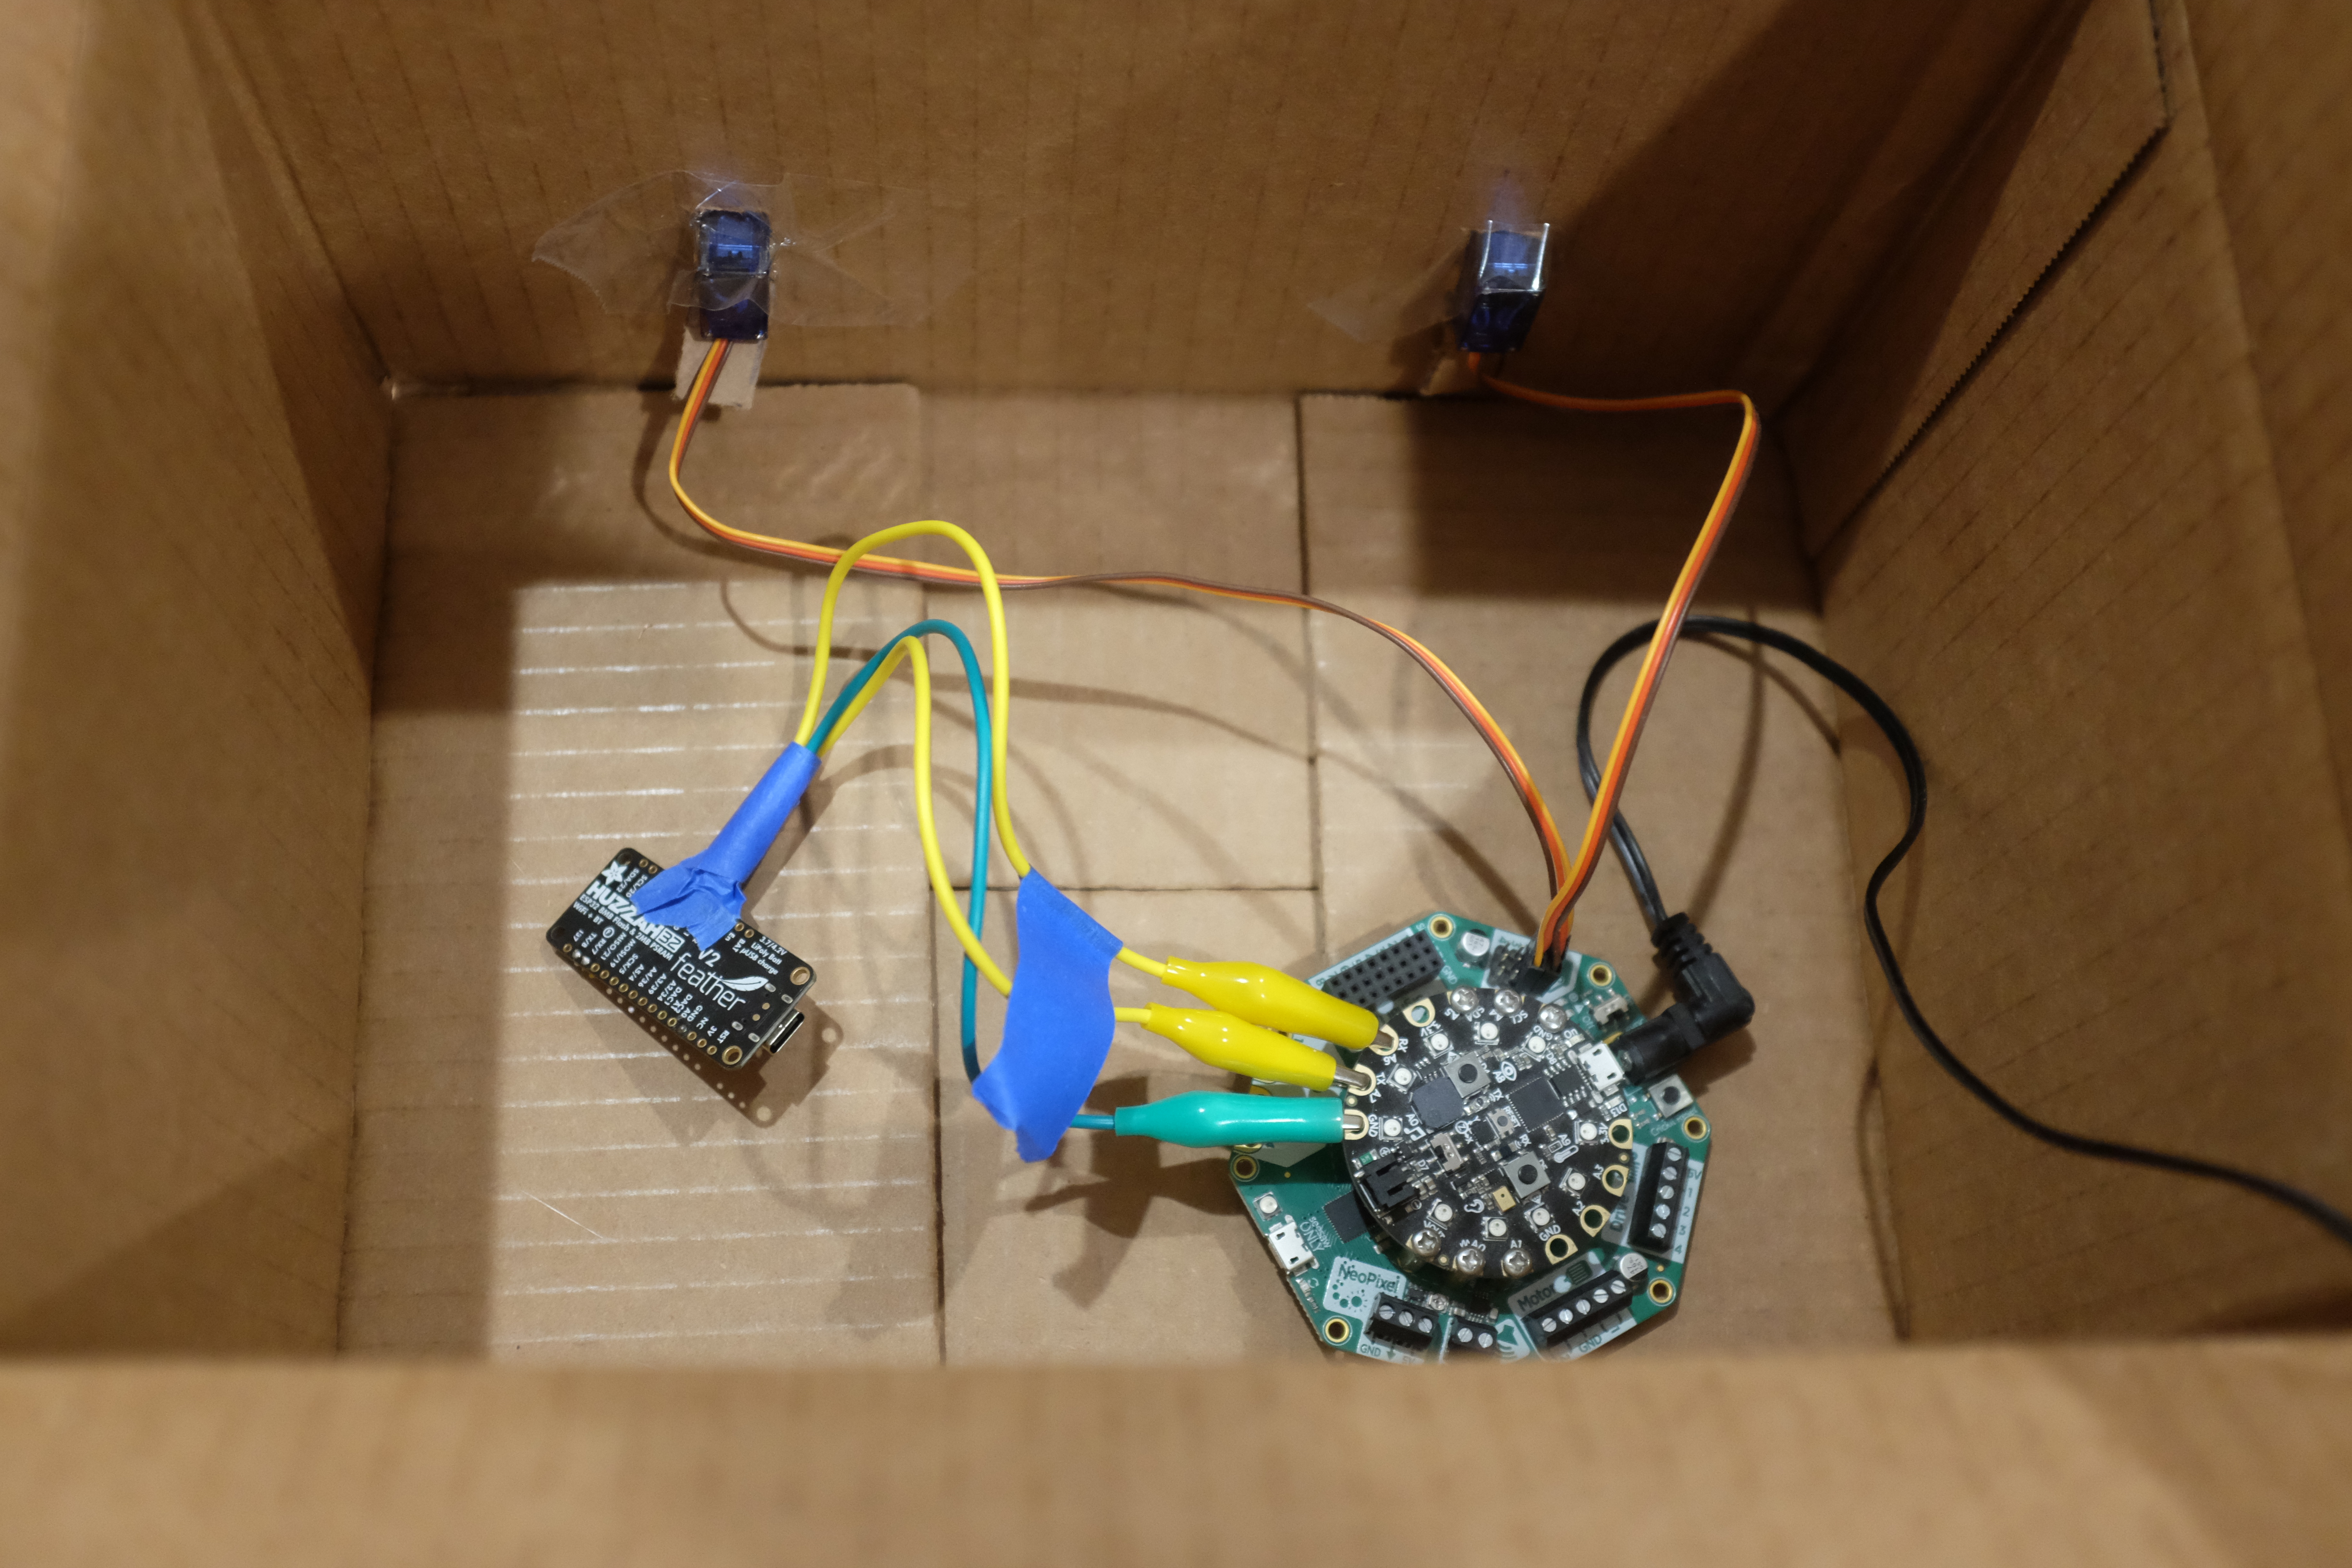
So, now we have some relevant data. What next? Our kid has a Circuit Playground Express that he noodles around with now and then. With the CRICKIT attachment it can control a few servos, which we would use for the gauges. The only problem was, it had no network capabilities. That was where the Feather M0 came in. It has wifi, but no CircuitPython support, which was key for having our kid involved. So, I had to configure the Feather to talk to the CircuitPlayground via a serial stream over the alligator clips.
Our kid was in charge of the servo code. His task was to write a function with two inputs, and move the servos to the right spots on the gauges. I have a huge regret here in that we did not preserve the code because we were just coding it live on the CircuitPlayground. Along the way we had a handy little test and calibration suite too. It was relatively simple, but the code was entirely his and we were all extremely proud of it. Unfortunately it was wiped when we started our next project, which I may get around to posting here.
In any case, it works! Here’s us testing it. He did a great job on that chicane too! Github repo for the project here.
He was 8 years old at the time of the video.